


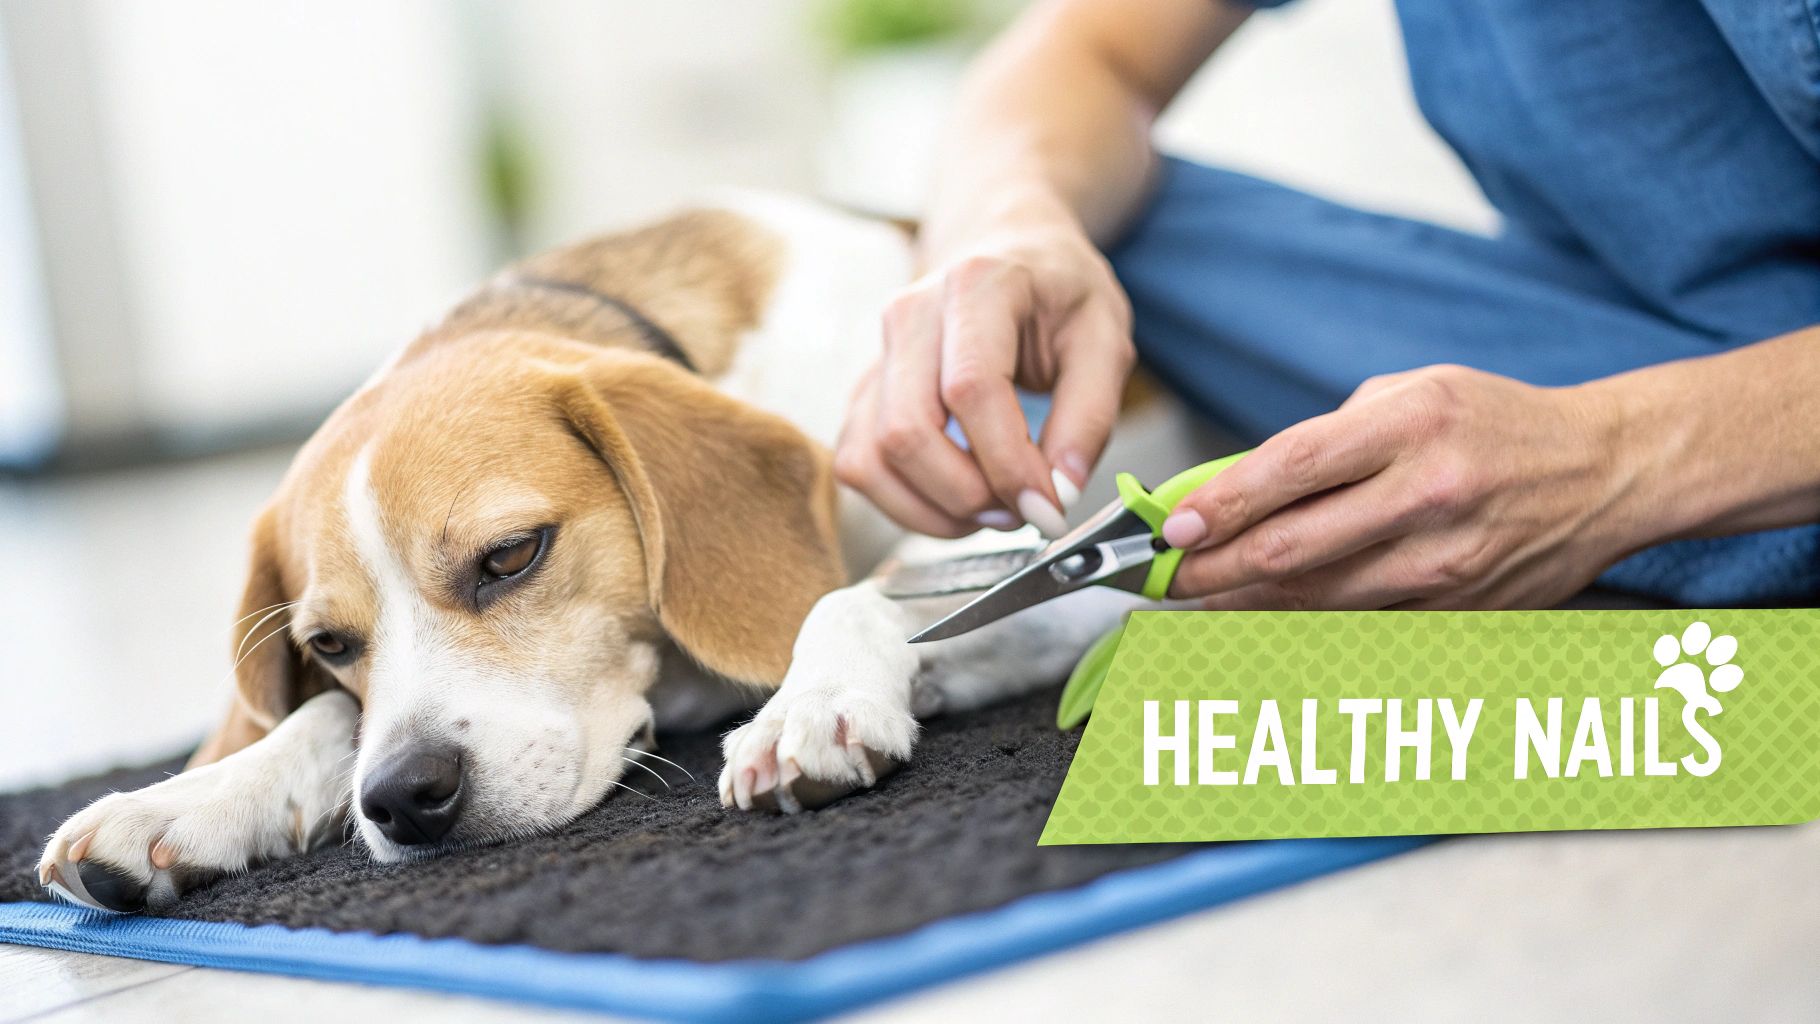
A Practical Guide to Choosing and Using a Dog Nail Cutter

Choosing the right dog nail cutter is a critical decision for your dog's well-being. This tool directly impacts their health, comfort, and attitude toward grooming. A positive experience can strengthen your bond, while a negative one can create lasting fear. This guide provides the actionable steps you need to trim your dog’s nails safely and confidently.
Why the Right Dog Nail Cutter Is Essential
Nail trimming is a non-negotiable part of your dog's healthcare. Overgrown nails are not just a cosmetic issue—they cause pain and can lead to serious, long-term health problems.
When a dog’s nails are too long, they push back into the nail bed with every step. Imagine the constant discomfort of wearing shoes that are two sizes too small. This is what your dog may be experiencing daily.
The Hidden Dangers of Long Nails
This persistent pressure forces a dog to alter its gait, shifting weight unnaturally to avoid pain. This compensation triggers a cascade of physical issues.
- Joint and Muscle Strain: An awkward gait places undue stress on leg joints, leading to soreness, arthritis, and even skeletal deformities over time.
- Reduced Mobility: When walking is painful, dogs become less active. This inactivity can lead to weight gain and a diminished quality of life.
- Risk of Injury: Long nails are prone to snagging on carpets, furniture, or outdoor terrain. A torn or broken nail is extremely painful and susceptible to infection.
Your Actionable Insight: A quality nail cutter is your most effective tool against these health risks. It transforms a dreaded task into a quick, routine part of your dog's wellness plan.
Getting Over Nail Trimming Anxiety
Many dogs fear nail trimming due to past negative experiences, often involving a cheap or dull clipper that crushed the nail instead of cutting it cleanly. This pain creates a lasting negative association.
As pet owners become more educated on animal wellness, the demand for high-quality grooming tools has surged. The global dog grooming market, valued at $1.53 billion in 2025, is projected to reach $2.61 billion by 2034. This growth is driven by owners seeking better products, a trend confirmed by a recent dog grooming market research report.
By selecting the right tool and using the proper technique, you can make nail trimming a calm, manageable task that supports your dog's health.
Exploring Different Types of Dog Nail Cutters
https://www.youtube.com/embed/J1A5BVOS6NA
Selecting the right dog nail cutter is like a chef choosing the right knife—the tool must fit the task. Your choice will depend on your dog's size, nail thickness, and temperament. Understanding the three main styles is the first step toward making a confident decision.
The increasing focus on pet health is reflected in the market. The global dog nail trimmer market was valued at $207.547 million in 2021 and is projected to reach $257.7 million by 2025. This growth underscores how many owners are actively searching for the best tools. You can explore this data in the dog nail trimmer market report.
Here's a practical breakdown of how each cutter type works and its ideal use.
Plier-Style Dog Nail Cutters
Resembling a small pair of pruning shears, plier-style clippers are the most common and versatile dog nail cutter. They feature two curved blades that come together to deliver a clean, powerful snip.
This design provides excellent leverage, making it the ideal choice for dogs with thick, dense nails, such as Great Danes or Rottweilers. The force applied through the handles ensures a clean slice rather than a painful crush. Their robust and straightforward design makes them a reliable option for most dog owners.
Guillotine-Style Dog Nail Cutters
Guillotine-style clippers operate with a single blade that slides across a stationary ring. You position your dog's nail within the ring, and a squeeze of the handle brings the blade across to trim the tip.
This mechanism offers excellent precision, making it a great choice for small to medium-sized dogs like Beagles or Corgis, whose nails are smaller and less dense. However, they can crush thicker nails, so they are not recommended for large breeds.
Your Actionable Insight: The effectiveness of a guillotine cutter depends entirely on blade sharpness. A dull blade will crush the nail, causing pain. If you choose this style, commit to regular sharpening or blade replacement.
Electric Dog Nail Grinders
For dogs (and owners) who are anxious about the "snap" of a traditional clipper, a nail grinder is an excellent alternative. Instead of cutting, a grinder uses a high-speed rotating abrasive band to file the nail down.
This method offers several distinct advantages:
- Smooth Finish: Grinders create a smooth, rounded nail edge, eliminating snags on carpets, clothing, or furniture.
- Reduced Risk: By filing the nail gradually, you have greater control and are far less likely to accidentally hit the quick (the sensitive part of the nail).
- Fear-Free Option: Many dogs who panic at the sight of clippers tolerate the low hum and vibration of a grinder more easily.
To find the right tool for your pet, explore a curated selection of high-quality pet grooming tools designed for various needs.
Making the right choice comes down to matching the tool to your dog. Use this chart to compare your options and determine which dog nail cutter is the best fit for your grooming kit.
Dog Nail Cutter Comparison
| Cutter Type | Best For | Pros | Cons |
|---|---|---|---|
| Plier-Style | Medium to large dogs; thick, tough nails. | Powerful, clean cut; durable and easy to use. | Can be intimidating for anxious dogs; requires confidence to avoid the quick. |
| Guillotine-Style | Small to medium dogs; thinner nails. | Very precise and easy to see the nail; quick trimming. | Can crush thick nails; blade requires frequent sharpening. |
| Grinder | Anxious or clipper-shy dogs; owners wanting smooth edges. | Low risk of cutting the quick; creates a smooth finish. | Takes longer; noise and vibration can bother some dogs. |
Ultimately, the best dog nail cutter is one that makes both you and your dog feel secure. Whether you choose the power of a plier-style, the precision of a guillotine, or the gentle approach of a grinder, the right tool makes nail care a stress-free routine.
How to Select the Perfect Nail Cutter for Your Dog
You now understand the different types of cutters. The next step is to apply that knowledge to select the right tool for your specific dog. This choice is crucial for ensuring every nail trim is safe, quick, and stress-free.
First, match the tool to your dog’s size and breed. A small guillotine cutter is perfect for a Chihuahua’s delicate nails, while the thick, tough nails of a Great Dane require the power and leverage of a heavy-duty plier-style clipper. Using an undersized tool on a large dog will crush the nail, causing significant pain.
The growing commitment to pet care is driving the market for quality tools. The global dog nail clippers market was estimated at $500 million in 2025 and is projected to grow by 7% annually through 2033. This shows owners are willing to invest in their pet’s health. You can read the full research on the dog nail clippers market for more details.
The Non-Negotiable Quality of the Blade
Regardless of the style you choose, blade quality is paramount. Always select a dog nail cutter made from high-quality, sharp stainless steel. A sharp blade ensures a clean, painless cut, while a dull blade crushes the nail with blunt force.
Imagine slicing a tomato: a sharp knife glides through cleanly, but a dull one creates a mess. The same principle applies to your dog’s nails. A dull clipper splinters the nail and causes pain, creating a negative association with grooming.
Your Actionable Insight: Invest in a tool with a sharp, durable blade to guarantee a positive nail-trimming experience. A clean cut is a quick cut, and a quick cut minimizes stress for your dog.
This is why we prioritize quality at Pet Magasin. Our grooming tools are crafted with sharp, long-lasting stainless steel blades to ensure a clean, comfortable cut every time.
Essential Safety and Comfort Features
After ensuring blade quality, look for features that enhance safety and ease of use. These details will boost your confidence and protect your dog.
-
Safety Guard: Many plier-style clippers include a small metal plate behind the blades. This quick guard acts as a guide to help prevent you from cutting the nail too short and hitting the sensitive quick. While not foolproof, it is an invaluable feature for beginners.
-
Ergonomic Handles: A secure grip is essential for control. Look for clippers with non-slip, cushioned handles that fit comfortably in your hand. This design reduces hand fatigue and prevents the tool from slipping during a critical moment.
-
Locking Mechanism: A safety lock that holds the blades closed is a must-have. It protects the blades from damage in storage and prevents accidental cuts when you reach for them.
Selecting the right tool sets the foundation for a successful grooming routine. For more in-depth advice, you can explore external resources on finding the best dog nail clippers for your pup. By considering your dog's size, blade quality, and these key safety features, you can choose a dog nail cutter that will serve you well for years.
Your Step-by-Step Guide to a Safe Nail Trim
With the right dog nail cutter in hand, you're ready to begin. This practical guide will walk you through the process of trimming your dog’s nails safely and calmly, turning it into a routine part of their care.
The goal is to create a positive association with nail trimming. This starts with preparing your environment, understanding basic nail anatomy, and acting with gentle confidence. It may feel new at first, but practice will make it second nature.
This visual guide summarizes the key factors to consider when choosing your tool.

As shown, the selection process is simple: match the tool to your dog’s size, verify the material quality, and look for built-in safety features.
Step 1: Prepare Your Environment
Set the stage for success before you begin. Choose a quiet, well-lit room where you won’t be interrupted. A calm setting promotes a calm dog.
Gather your supplies in advance: your dog nail cutter, high-value treats, and styptic powder or cornstarch. Having styptic powder readily available "just in case" provides a crucial confidence boost.
Step 2: Find a Comfortable Position
Your posture and comfort are as important as your dog's. If you are tense, your dog will sense it. Find a position that allows you to hold your dog’s paw securely without straining yourself or them.
- For small dogs: Sit on the floor and hold your dog in your lap, with their back against your chest. This position offers gentle restraint and good control.
- For large dogs: Have your dog lie on their side while you sit on the floor beside them. This provides easy access to their paws in a relaxed posture.
Hold the paw firmly but gently, and isolate the toe you are working on for a clear view. Protective gear like grooming gloves can improve your grip and protect your hands. You can find options for durable pet grooming gloves to suit your needs.
Step 3: Identify the Quick
The "quick" is the bundle of nerves and blood vessels inside each nail. Cutting it is painful and causes bleeding. Avoiding the quick is the most important rule of nail trimming.
On light-colored nails, the quick is visible as the pink section inside the nail. On dark or black nails, it is hidden. To trim dark nails safely, look at the cut surface of the nail tip. As you trim tiny slivers, a small dark circle will appear in the center. This indicates you are approaching the quick and should stop.
Your Actionable Insight: Trim tiny slivers off the end of the nail. It is always better to trim too little than too much. This incremental approach virtually eliminates the risk of hitting the quick.
Step 4: Make Small, Confident Cuts
Now, it's time to clip. Hold your dog's paw firmly and position the dog nail cutter to snip a very small piece off the end.
Use a quick, decisive motion. Hesitation can cause the clipper to crush the nail rather than slice it. After the first snip, examine the cut surface. If you see only white, you can safely trim another tiny piece.
Reward your dog generously. Offer praise and treats after each paw—or even after each nail for anxious dogs. This positive reinforcement builds their confidence for future sessions.
If you find the process too stressful, there is no shame in seeking professional help. Professional pet grooming services offer a safe and efficient alternative, ensuring your dog’s paws remain healthy while giving you peace of mind.
Common Nail Trimming Mistakes and How to Avoid Them
Knowing what not to do is as important as knowing what to do. Even with the best dog nail cutter, common mistakes can turn a routine task into a stressful event. By understanding these pitfalls, you can avoid them.
Recognizing these errors will help you make every trim safer, more comfortable, and a positive bonding experience.
Mistake 1: Trying to Cut Too Much at Once
The most common mistake is attempting to remove too much of the nail in a single cut. This dramatically increases the risk of hitting the quick, which causes pain, bleeding, and creates a lasting fear of clippers.
The Solution: Adopt a "less is more" approach. Trim off tiny slivers from the end of the nail, one at a time. After each small cut, inspect the nail’s surface. As long as the center is white, you can safely trim another small piece. This methodical technique gives you complete control.
Mistake 2: Using a Dull Dog Nail Cutter
A dull dog nail cutter crushes the nail instead of slicing it cleanly. This crushing pressure is painful and can cause the nail to split or splinter. It is a primary reason why many dogs develop a fear of nail trims.
The Solution: Always use a sharp tool. Invest in quality clippers with stainless steel blades, like those from Pet Magasin, which are designed for durability and a clean cut. Before each session, check your clippers. If they seem to be crushing rather than cutting, it's time to sharpen or replace them.
Your Actionable Insight: A sharp blade is the single most important factor for a quick, clean, and painless snip. It can transform your dog's experience from fearful to manageable.
Mistake 3: Creating a Stressful Environment
Dogs are highly attuned to our emotions. If you are anxious or frustrated, your dog will mirror that stress. A noisy, chaotic room or a rushed process will only heighten their anxiety.
The Solution: Create a calm, positive setting.
- Choose a quiet space: Find a well-lit area free from distractions.
- Stay calm and confident: Your relaxed energy is contagious. Speak to your dog in a soothing voice throughout the process.
- Don't rush: If you are short on time, postpone the trim. Rushing increases the likelihood of mistakes.
Mistake 4: Forgetting Positive Reinforcement
A major error is treating nail trimming as a chore without rewarding your dog's cooperation. If the experience is entirely negative for them, they will resist it.
The Solution: Make it a rewarding activity. Keep high-value treats on hand and offer them frequently. Praise your dog enthusiastically after each nail or paw. This helps them associate the dog nail cutter with positive outcomes, making them a more willing participant next time.
Keeping Your Dog Nail Cutter in Top Condition
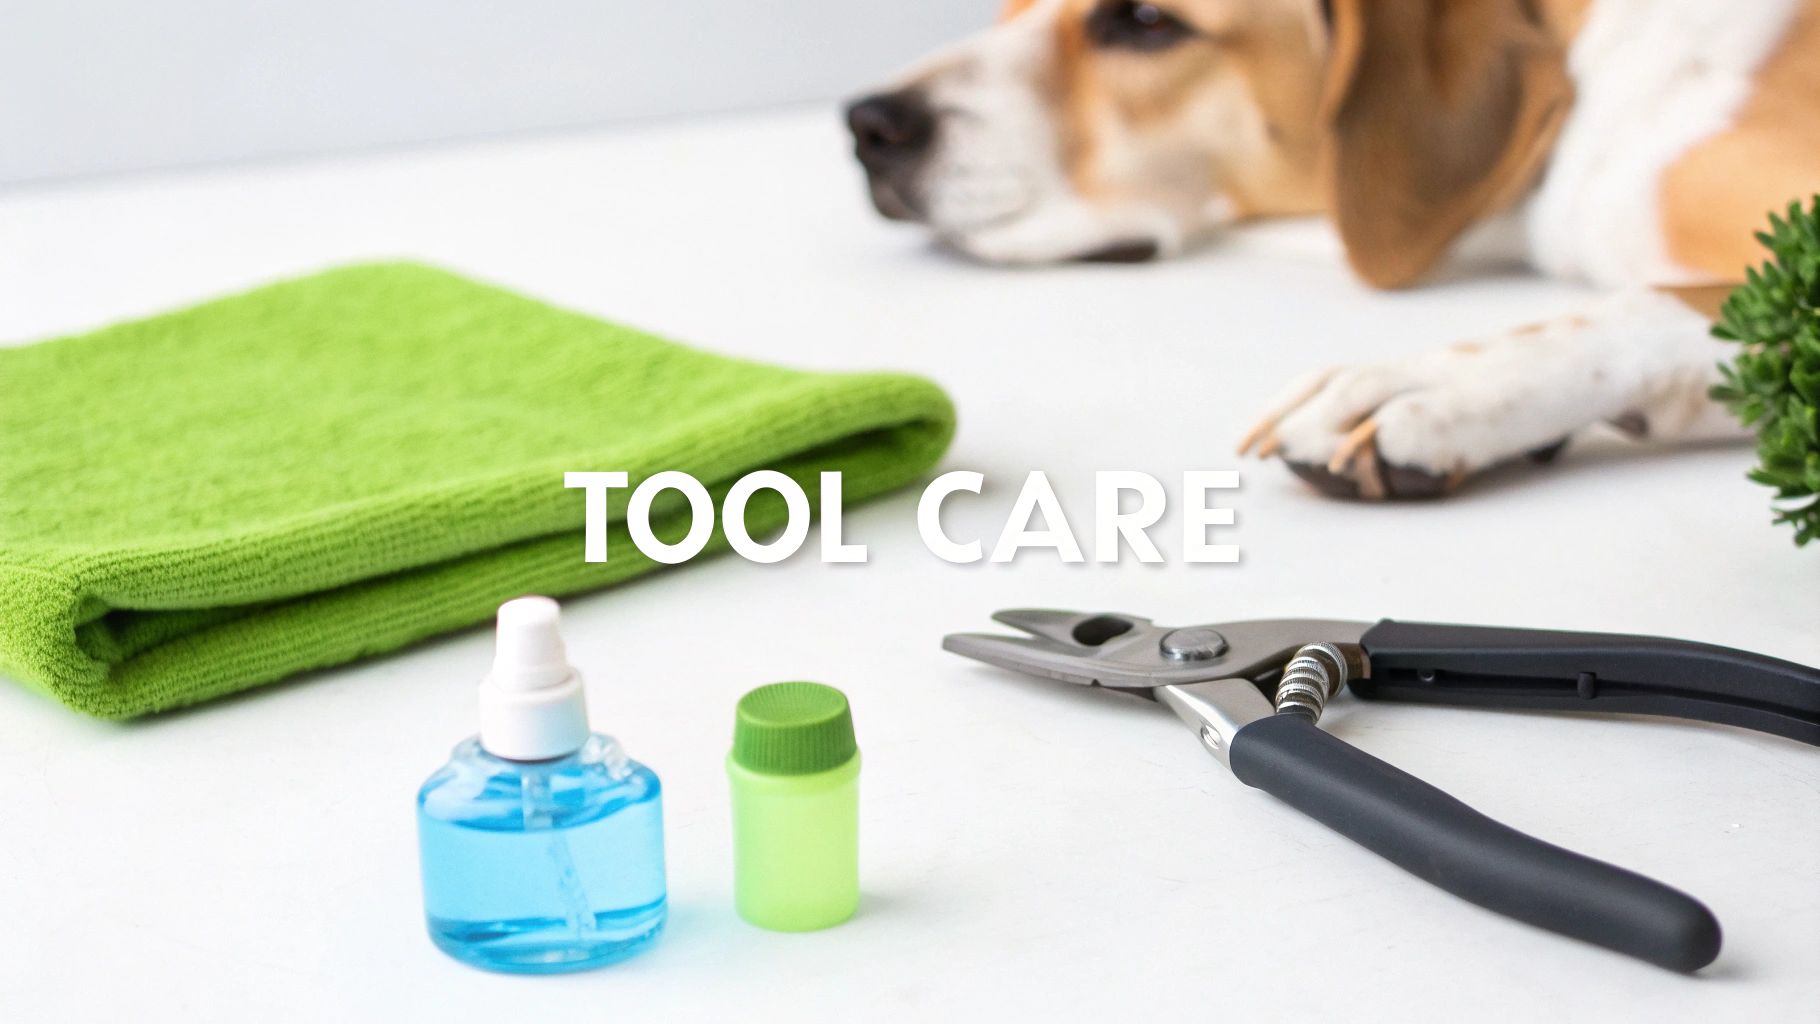
A high-quality dog nail cutter is an investment in your dog's comfort and health. Like a chef’s knife, it requires basic maintenance to perform its best. These simple habits will keep your clippers safe, effective, and sharp for years.
Proper care protects your dog from the pain of a dull, crushing blade and ensures every trim is a smooth, positive experience.
A Simple Post-Trim Cleaning Routine
Take two minutes to clean your clippers after each use. This prevents the buildup of debris and the spread of bacteria or fungus.
Follow these simple steps:
- Wipe Down the Blades: Use a clean cloth to wipe away nail dust and debris from the blades.
- Disinfect for Safety: Moisten a cotton ball with rubbing alcohol and carefully sanitize the blades.
- Dry and Store Properly: Ensure the clippers are completely dry to prevent rust. Engage the safety lock to protect the blades and store them in a dry place.
This quick ritual is the most effective way to maintain your dog nail cutter.
Your Actionable Insight: A clean tool is a safe tool. Regular disinfection minimizes the risk of introducing bacteria into the nail bed and keeps your dog's paws healthy.
How to Check for and Sharpen Dull Blades
Even the best blades will dull over time. A dull blade crushes the nail, causing pain and anxiety. Check your clippers for sharpness regularly.
A simple test: try to cut a piece of uncooked spaghetti. If the clippers snap it cleanly, the blade is sharp. If they crush or splinter it, it’s time to sharpen them.
Sharpening a plier-style or scissor-style dog nail cutter is a simple process using a ceramic rod sharpener.
- Secure the Clipper: Hold the tool firmly with the blades open.
- Follow the Blade's Angle: Place the sharpener against the blade, matching the existing bevel (angle).
- Sharpen with Smooth Strokes: Draw the sharpener across the blade in a single, smooth direction, from base to tip. Repeat 5-10 times until the edge feels sharp.
By maintaining your tool, you ensure every cut is clean and painless, reinforcing a routine of trust and comfort with your dog.
Frequently Asked Questions About Dog Nail Trimming
Even with the right technique, questions often arise. Here are answers to common concerns to help you trim with confidence.
How Often Should I Trim My Dog's Nails?
Listen for the answer. If you hear your dog's nails clicking on hard floors, it's time for a trim.
For most dogs, this means a trim every 3-4 weeks. However, lifestyle is a key factor. Dogs who frequently run on pavement may wear down their nails naturally and require less frequent trims. Less active or older dogs will likely need more consistent attention.
What Should I Do If I Accidentally Cut the Quick?
First, stay calm. Your dog will take cues from you. It happens to nearly every dog owner.
Immediately apply styptic powder or cornstarch to the nail tip. Apply firm pressure for about 30 seconds to stop the bleeding. Afterward, give your dog a favorite treat and praise to end the session on a positive note.
Your Actionable Insight: Be prepared. Keep styptic powder in your grooming kit before you start. This allows you to handle any accident quickly and calmly, which minimizes stress for your dog.
Can I Use Human Clippers on My Dog?
No. Human nail clippers are designed for our flat nails. They squeeze and crush a dog's round nail, which is painful and can cause it to splinter or crack.
Always use a dog nail cutter specifically designed for the task. Whether you choose a scissor-style, guillotine, or grinder, the correct tool is essential for a safe, clean cut.
How Can I Help My Anxious Dog Tolerate Nail Trims?
Patience and positive reinforcement are key. The goal is to slowly replace fear with a positive association.
- Start Slow: Allow your dog to see and sniff the dog nail cutter. Reward them with a treat for calm behavior.
- Touch and Treat: Gently touch the clippers to their paws without cutting. Reward them again.
- One Nail at a Time: Trim a single nail, then end the session with high-praise and a special treat. You can trim the rest over the following days.
Short, positive, and rewarding sessions will build trust over time. For more guidance on grooming challenges, visit our comprehensive Pet Magasin FAQ page.
Ready to make nail trimming a safer and more comfortable experience for your dog? The Pet Magasin Professional Dog Nail Clippers are designed with sharp stainless steel blades, a safety guard, and ergonomic handles to give you confidence and control. Upgrade your grooming kit today.

Leave a comment