
Best Pet Nail Clippers: The Complete Buyer's Guide

You've settled your dog or cat beside you, lifted one paw, and now you're holding the clippers without making the first cut. The nail looks small, the quick is hard to judge, and your pet has started watching your hands. That hesitation is sensible. Nail trimming requires a tool that matches the nail, but it also requires a calm process that protects the animal and the person doing the work.
The best pet nail clippers aren't just the sharpest or most popular. They're the tool that gives you enough control for your pet's nail thickness, your pet's temperament, and the visibility of the quick. A nervous cat with delicate claws needs a different approach from a large dog with dense, dark nails.
Why the Right Clipper Matters for Your Pet's Health
Long nails can change how a pet places its feet. A dog may stand with its toes pushed upward, slip more easily on smooth flooring, or resist walking because each step puts pressure on the nail. Cats can also develop painful claws when a nail grows around toward the paw pad. Nail care is therefore part of comfort and mobility, not just appearance.
The tool itself affects the experience. A dull blade can compress or split the nail, while an oversized handle can make a small paw difficult to control. If your pet jerks away while the blade is poorly positioned, you may injure the quick, your own fingers, or both.
The risk is real, even for professionals
A 2026 peer-reviewed clinical survey found that 79.8% of respondents, or 193 of 242, reported being injured while performing nail clipping in veterinary settings, according to the clinical report on occupational injuries during veterinary nail clipping. These were trained professionals working in environments designed for animal handling, so the finding deserves attention from home groomers.
The statistic doesn't mean you should avoid trimming your pet's nails. It means you should treat the task as a controlled handling procedure. A secure grip, a correctly sized cutting head, and incremental cuts reduce the chance that a sudden movement turns a routine trim into an injury.
Practical rule: Choose the clipper that lets you stop instantly and reposition, not the one that promises the fastest cut.
A calm pet also matters more than completing every nail in one sitting. If your dog pulls away or your cat begins struggling, pause and reward calm behavior. You can finish another time. A short, positive session teaches your pet that paw handling is manageable, while a rushed session can make the next attempt harder.
Understanding the Main Types of Pet Nail Clippers
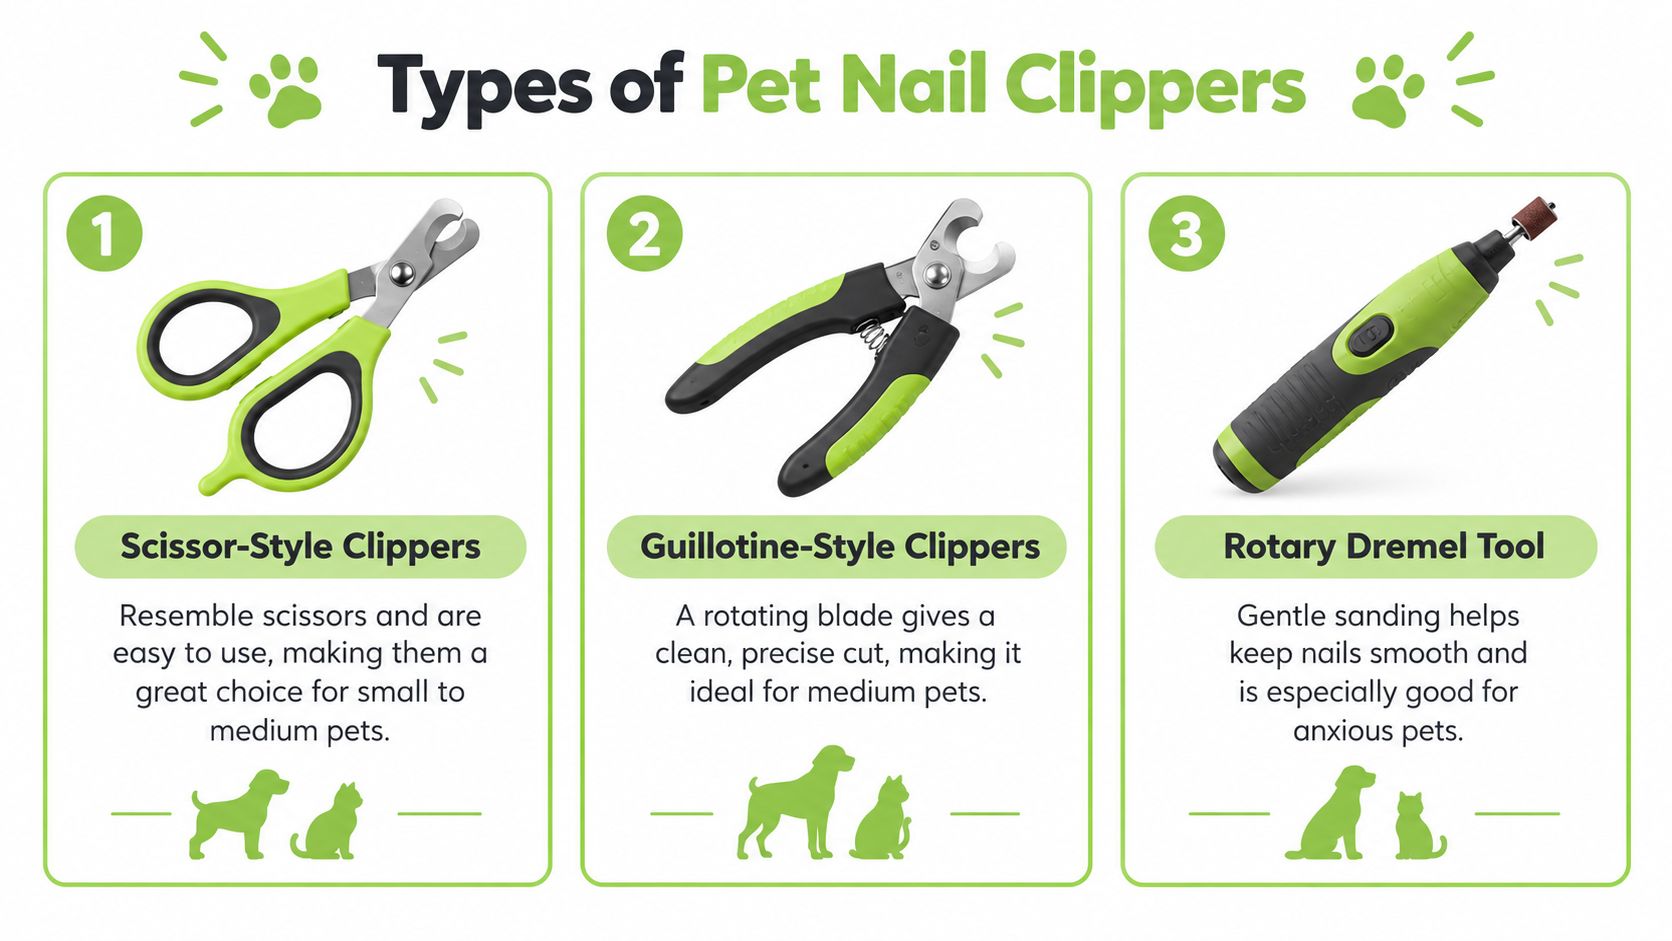
Pet nail tools work in different ways, and those mechanical differences matter. Scissor-style clippers shear the nail between two crossing blades. Guillotine clippers push a nail through an opening while a single blade moves across it. Rotary grinders remove material gradually through abrasion instead of cutting it in one stroke.
How each design behaves
Veterinary guidance generally favors a sharp, crossed double-blade design for clean cutting. The VCA guide to nail trimming and handling exercises explains that guillotine tools can crush the nail, while sharp crossed blades reduce compressive force and create a shearing cut. That distinction becomes more important as nails become thicker or harder.
Scissor-style or plier-style clippers usually give you better control over the cutting angle. They suit owners who want to take small bites from a specific edge of the nail. Choose a head that opens comfortably around the nail without forcing you to twist the paw.
Guillotine clippers can feel simple because the nail enters a hole before the handle closes. However, that opening limits how you position the nail and can create crushing pressure when the blade isn't very sharp. They may suit some smaller pets with softer nails, but they're less forgiving when you need to shape the cut or work around a visible quick.
A grinder sands the nail rather than cutting it. This can help owners who fear taking one large bite, and it may produce a smoother edge. The tradeoffs are noise, vibration, dust, battery dependence, and a slower process. Some anxious pets tolerate gradual sanding better, while others react strongly to the motor.
| Tool Type | Cut Mechanism | Best For | Primary Drawback |
|---|---|---|---|
| Scissor or plier style | Two crossed blades shear the nail | Owners needing precise control and pets with thicker nails | A rushed cut can still reach the quick |
| Guillotine style | A blade passes across a nail held in an opening | Some small pets with softer nails | Can crush the nail and restrict cutting angle |
| Rotary grinder | An abrasive wheel or band sands the nail | Gradual shaping and owners who prefer sanding | Noise, vibration, dust, and slower handling |
If you're deciding between clipping and grinding for an anxious dog, this practical comparison of dog nail grinders versus clippers can help you weigh control, sound, and trimming speed. For most households, a sharp scissor-style tool is the strongest starting point, with a grinder as an alternative when the pet or owner responds better to gradual sanding.
Matching the Clipper to Your Pet's Size and Nail Type
Species is only the first filter. A small cat, a toy-breed dog, and a large dog may all need different cutting heads because their nails differ in diameter, curvature, and hardness. Look at the nail in front of you rather than relying only on the label “for dogs” or “for cats.”
Start with the cutting opening. For a small cat or toy-breed dog, a large plier head may obscure the nail and make it difficult to see where the blades will land. A compact scissor-style clipper usually gives better visual access. Larger dogs with dense nails need a sturdier tool whose blades can close cleanly without forcing your hand.
Build a decision around four observations
Measure thickness by resistance. If the nail bends slightly and the blades close smoothly, the clipper is probably suitable. If the handle flexes, the nail stalls between the blades, or you feel crushing rather than cutting, stop and choose a stronger design or a grinder.
Check the quick's visibility. Light nails let you see the pink or darker inner area more easily. Dark nails require smaller cuts and more frequent inspection, so choose a tool with a clear cutting head and handles that don't obstruct your view.
Assess your grip. A spring-loaded handle can reopen the blades between cuts, reducing repeated hand repositioning. Look for a non-slip surface, especially if your pet's paw is damp or you tend to tense your hand during trimming. A tool that feels stable in your palm is safer than one that is technically sharp but awkward.
Account for temperament. A calm pet may tolerate a quick, clean clip. A fearful pet may need a grinder introduced gradually, or a smaller clipper that lets you make one controlled cut before pausing. For a multi-pet household, buying one tool for every animal often works better than forcing every pet to use the same size.
The category data reflects why many owners encounter guillotine tools in stores. Independent estimates placed guillotine clippers at 38.2% of the pet nail-clipper market in 2025, while dogs represented 52.1% of revenue share, according to the pet nail-clipper market estimate. Market share shows availability and demand, not that one design is right for every animal.
Look for a match, not a ranking: the best choice is the smallest tool that cuts your pet's nail cleanly while leaving you a clear view of the cutting point.
For thick nails that resist a small clipper, don't compensate by squeezing harder. Excess pressure can crush the nail and frighten the pet. Move to a sturdier scissor-style model, take thinner slices, or ask a veterinary professional to demonstrate the appropriate tool.
Step-by-Step Guide to Trimming Nails Safely
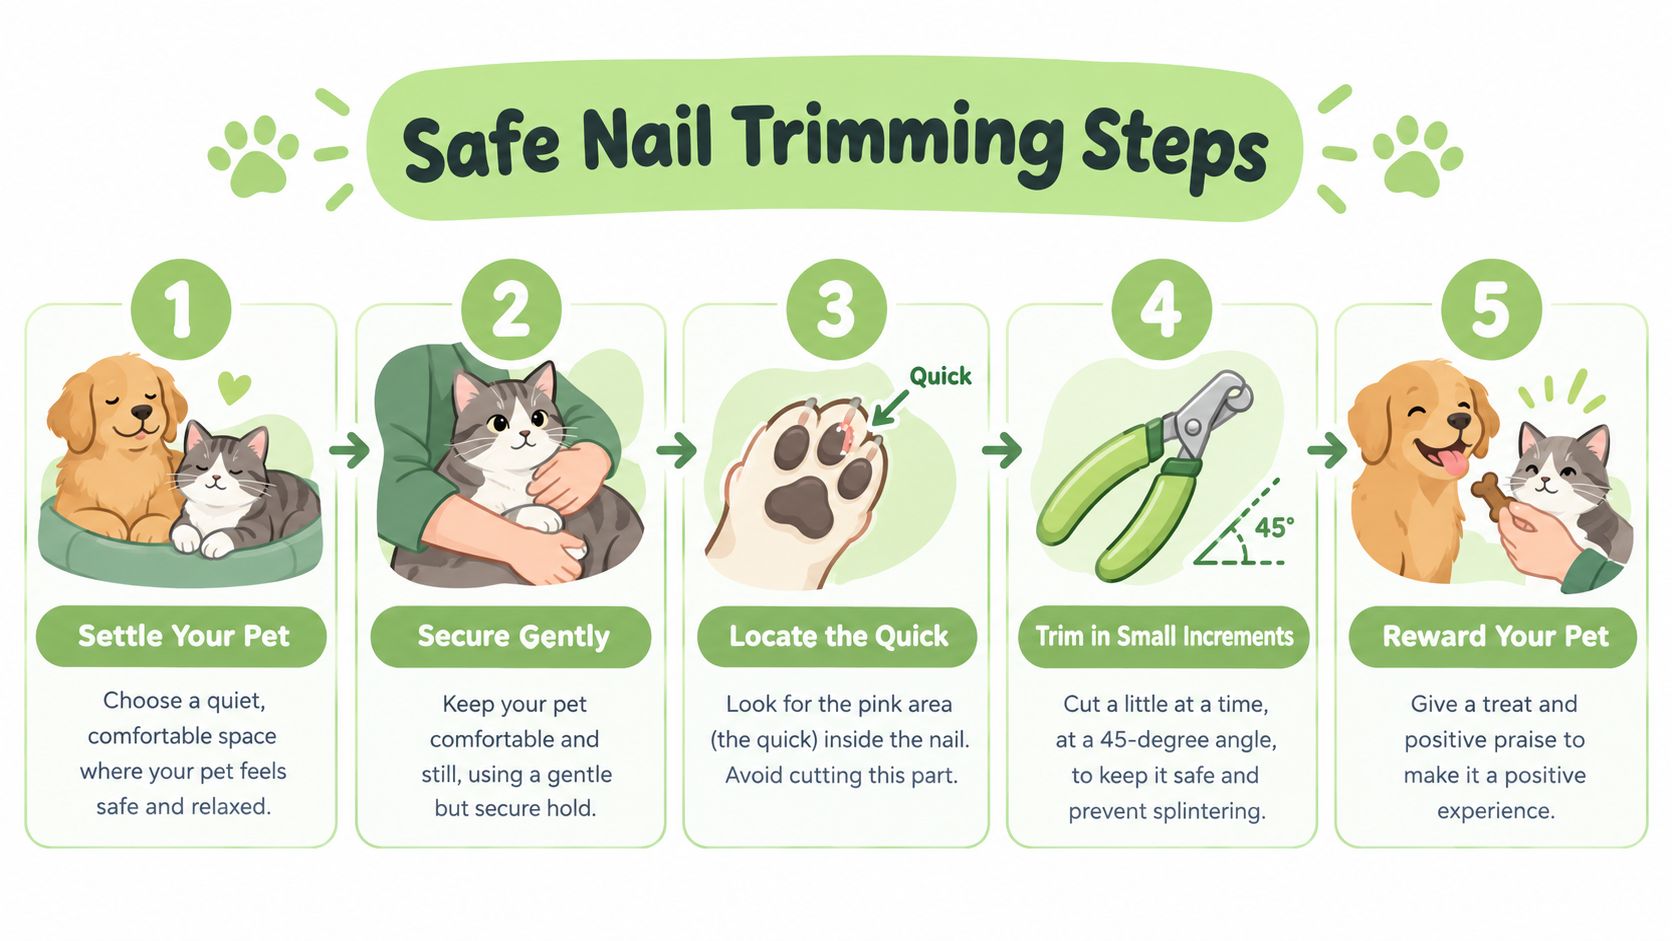
A reliable trim starts before the blades touch the nail. Put your pet on a stable, nonslip surface in a quiet room. Prepare the clipper, a reward, and bleeding-control supplies so you won't need to search for them if your pet moves suddenly.
Use a small, repeatable sequence
- Settle the pet. Let your dog or cat sniff the tool. Touch the shoulder, leg, and paw in sequence, rewarding relaxed behavior. Don't begin by grabbing a paw that your pet is trying to hide.
- Support the paw gently. Hold the leg close enough to prevent a sudden twist, but don't squeeze the toes. For a dog, expose the nail by pressing lightly on the toe. For a cat, extend the claw with gentle pressure on the toe pad and top of the toe.
- Find the safe cutting area. On a light nail, identify the quick and leave approximately 2–3 mm of space before it, following the Washington State University veterinary nail-trimming guidance. On a dark nail, remove only 1–2 mm at a time. Inspect the cut surface after every small bite. Stop when a gray-to-pink oval appears.
- Set the angle. Hold the cutting head at roughly a 45-degree angle, following the natural slant of the nail. For cats, the PetMD explanation of cat nail trimming describes this angle as helping the claw rest comfortably when the cat walks. For dogs, avoid clipping beyond the curve, which the American Kennel Club's safe dog nail-trimming guide identifies as a higher-risk area.
- Reward and stop early. Give a treat after each calm nail or after a few seconds of relaxed paw handling. If your pet becomes tense, finish on a manageable success rather than pushing through resistance.
A cat owner may benefit from these additional cat nail trimming tips, particularly when the cat retracts its paw or becomes unsettled. The same principles apply: expose only the tip, work slowly, and respect the animal's signals.
The following video can help you visualize positioning and movement before trying the process yourself.
For a fuller dog-focused workflow, use this dog nail clipping guide alongside your first session. If your pet cannot remain still, has severely overgrown nails, or reacts with panic, stop and arrange help from a groomer or veterinary team.
Essential Safety Features and Common Mistakes to Avoid
A safety guard can limit how far a nail enters the cutting head, but it can't identify the quick for you. The quick varies in position, especially when nails are dark or overgrown, so a guard should support careful technique rather than replace visual inspection.
Prioritize features that improve physical control. A non-slip grip helps keep the tool stable if your hand changes position. A tension spring reopens the handles between cuts, which makes repeated small trims less tiring. Blades should meet evenly across their full cutting surface. If they leave a crushed edge or require excessive force, they need sharpening, replacement, or a different tool.
Mistakes that create avoidable trouble
- Cutting past the curve: On dog nails, the curve is a practical stopping landmark. Take a smaller bite instead of trying to shorten the nail in one motion.
- Using a dull blade: A dull edge squeezes before it cuts. That pressure can split the nail and make your pet pull away.
- Restraining too firmly: Force can increase struggling. Support the limb and release briefly when your pet shows escalating stress.
- Rushing dark nails: Remove a thin slice, inspect the center, and repeat only while the cut surface remains safely distant from the quick.
- Ignoring tool alignment: Misaligned blades can catch the nail instead of shearing it. Test the closing action before placing it around the toe.
If you do cut too short, stay composed and apply pressure immediately. Veterinary guidance recommends styptic powder, and Purina's instructions for stopping nail bleeding notes that flour or cornstarch can serve as alternatives when styptic powder isn't available. Hold the material against the nail with steady pressure and monitor the bleeding. If it doesn't stop within minutes, or if the injury appears serious, contact your veterinary practice.
Prepare before the first cut: having styptic powder within reach protects your pet and keeps a small mistake from becoming a frantic search through a drawer.
Clean the clipper after use and keep the blades dry. Check the hinge and spring regularly. A tool that develops resistance, rust, or uneven closure doesn't belong in the next grooming session.
Building a Complete Grooming and Travel Kit
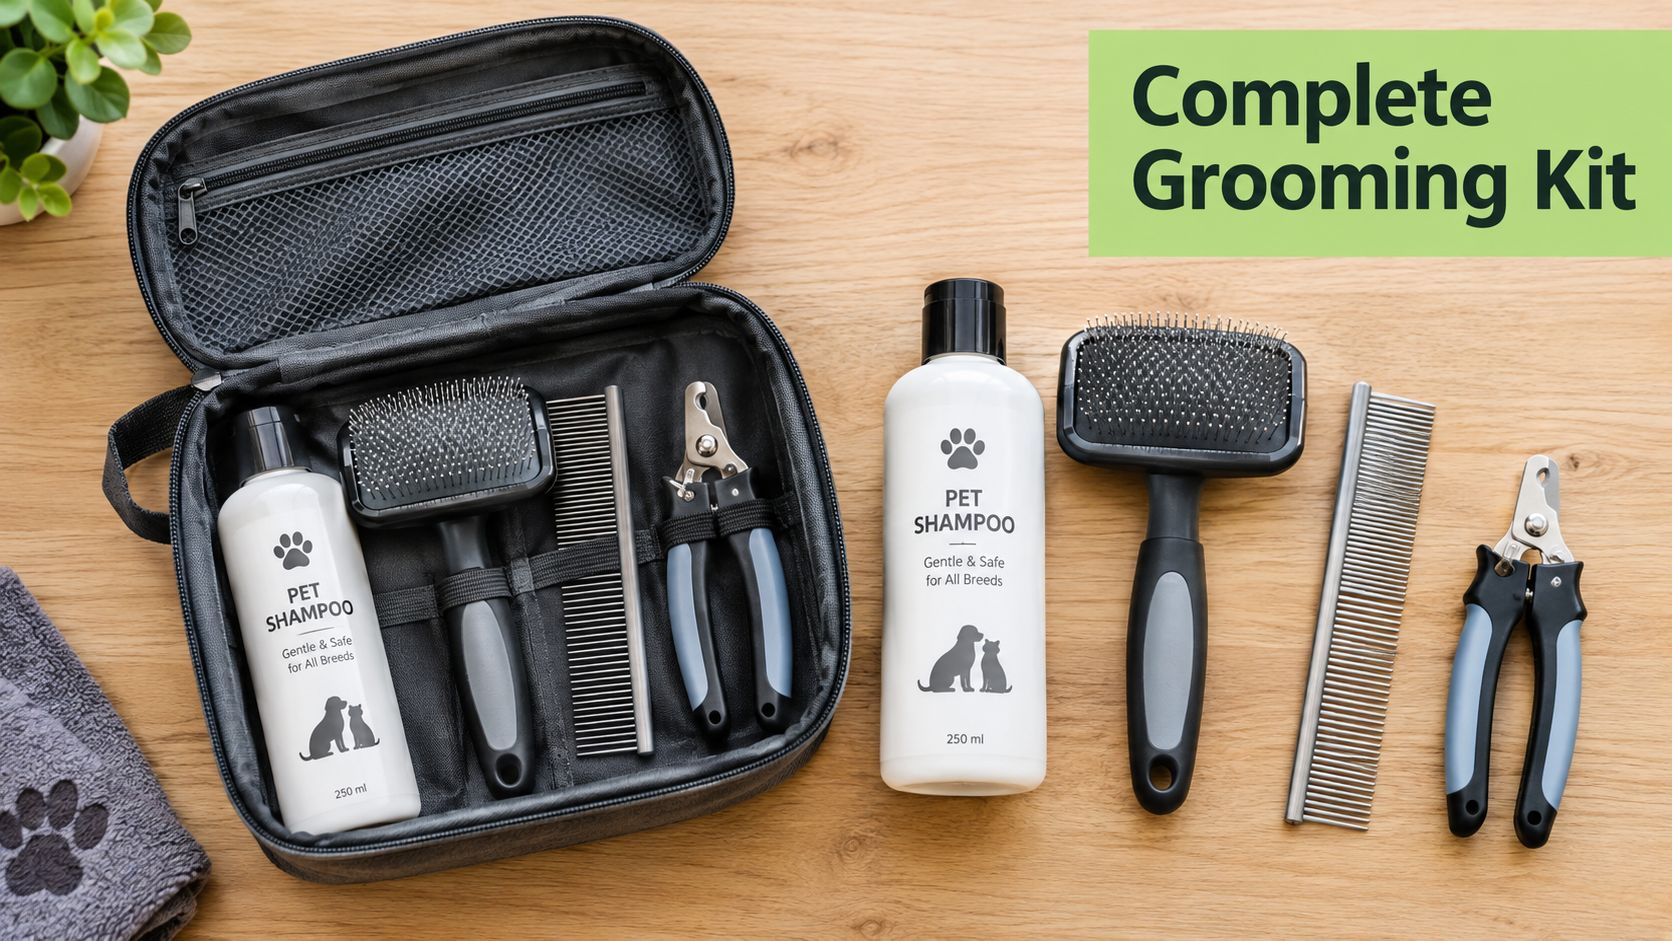
Nail clippers work best as part of a small routine, not as an isolated purchase. Keep the clipper with a nail file, a towel or nonslip mat, treats, and a compact container of styptic powder. A file can smooth a sharp edge after clipping, while treats help you reinforce calm paw handling instead of rewarding only the finished trim.
Create a routine your pet can predict
Choose a consistent cue, such as placing the mat on the floor, then reward your pet for approaching it. On some days, the session may involve only touching the paw. On another day, you may clip one nail. This gradual pattern is particularly useful for rescue pets, cats that dislike restraint, and dogs that react to the sound of cutting.
Recent expert roundups increasingly present nail care as a complete workflow involving tool choice, technique, and routine frequency, rather than a product comparison alone, as reflected in Vetstreet's dog nail-clipper guidance. Your pet's activity, flooring, and natural nail wear affect how often you need to inspect the paws, so use the nail's length and your veterinarian's advice rather than an arbitrary calendar.
For travel, pack the clipper in a protective case, bring a file and styptic pen, and store treats in a sealed pouch. If you use a rotary grinder, include its charger and spare sanding bands. A compact grooming kit can also support basic brushing and coat care. These dog grooming and health tips offer useful context for organizing those tasks around your pet's broader care routine.
Pet Magasin's pet grooming tools guide can help you identify complementary supplies for a home or travel kit. Keep the kit accessible, but separate sharp tools from food and make sure every item is clean before use.
Your Final Buying Checklist for Stress-Free Grooming
Use the product description as a safety test, not a marketing exercise. The right clipper should answer practical questions about your pet's anatomy and your own handling ability.
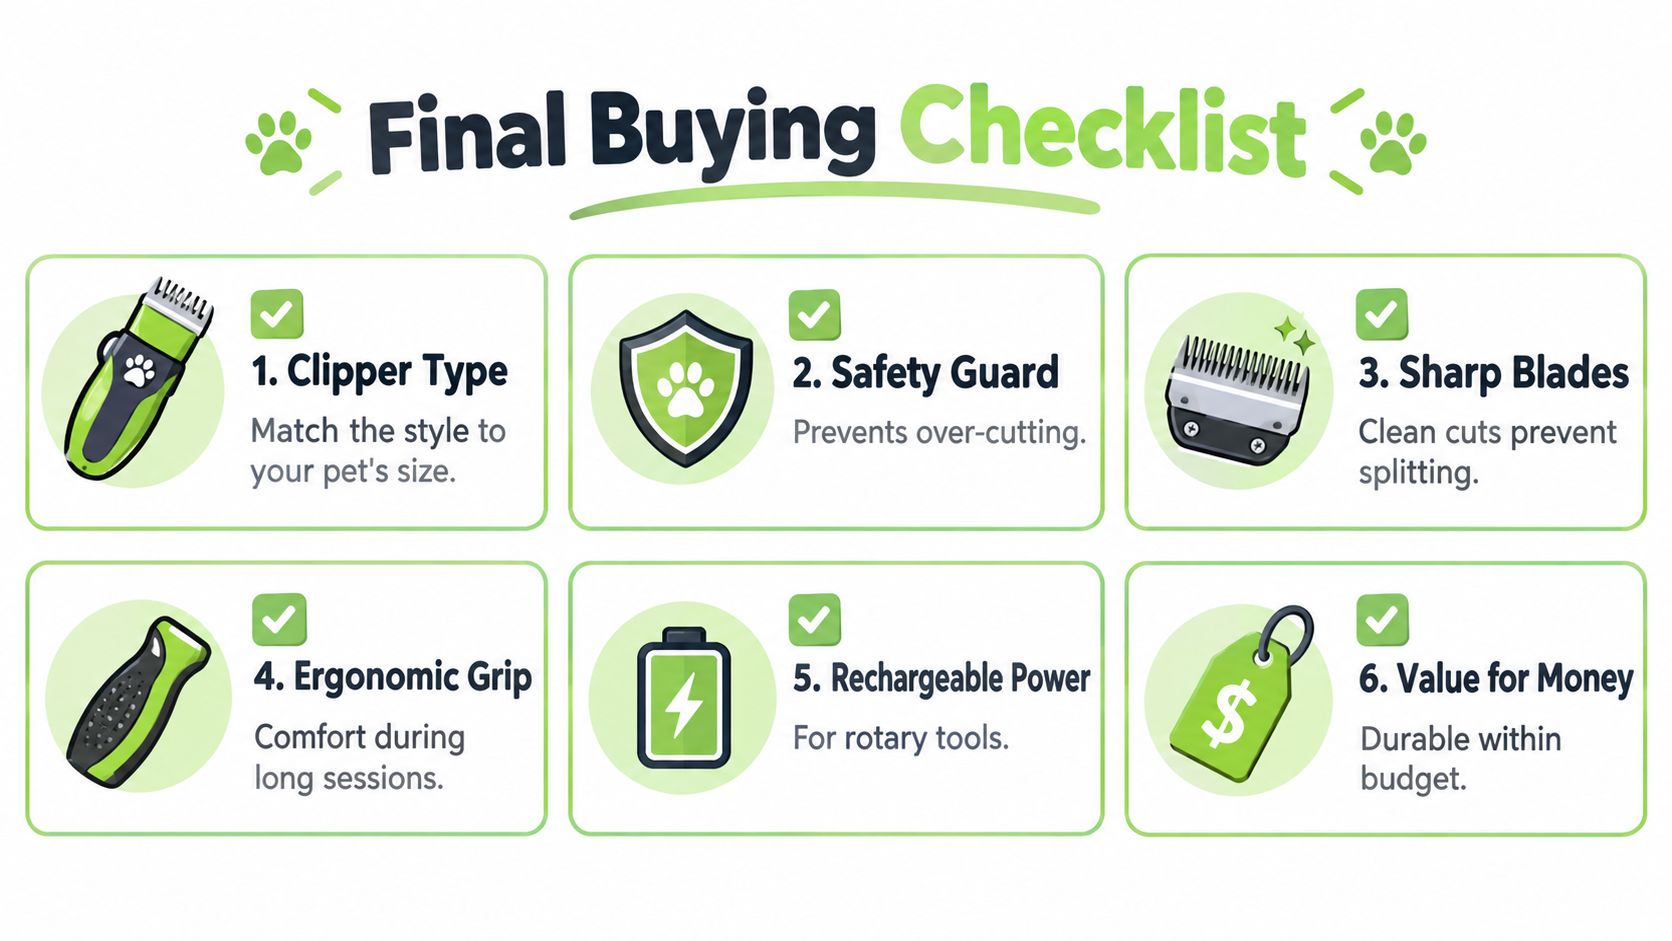
- Choose the clipper type: Select a compact scissor-style head for smaller nails, a sturdy plier-style design for thicker nails, or a grinder if gradual sanding better suits your pet.
- Inspect the blades: Look for sharp, aligned blades that create a shearing action instead of squeezing the nail.
- Test the grip: Handles should sit securely in your hand and remain stable without excessive force.
- Check the reopening action: A tension spring can make repeated small cuts easier to control.
- Evaluate the guard carefully: Treat a safety stop as an aid, not permission to insert more nail than you can see.
- Plan for maintenance: Confirm that replacement blades, sanding bands, or cleaning instructions are available for the tool you choose.
Read reviews for comments about nail thickness, blade alignment, hand comfort, and pet response. Ignore praise that only says a tool is “easy” unless the reviewer explains what made it easy. A useful review tells you whether the clipper handled a small cat claw, a dense dog nail, or a fearful pet without forcing a large cut.
Your final choice should leave you able to see the nail, control the angle, and stop immediately. Buy the tool that supports those actions, then pair it with patient handling and prepared bleeding control.
Pet Magasin offers practical pet supplies, including grooming tools designed for routine care and comfort. Visit Pet Magasin to explore nail-care and grooming options that can help you build a calmer at-home routine for your dog or cat.

Leave a comment