
A Practical Guide on How to Groom Your Dog at Home

Before you begin grooming, your first action is to get your gear in order. Having the right tools for the job is the single most important step. It's what separates a frustrating wrestling match from a calm, positive bonding experience. Let's build your toolkit.
Your Essential At Home Dog Grooming Toolkit
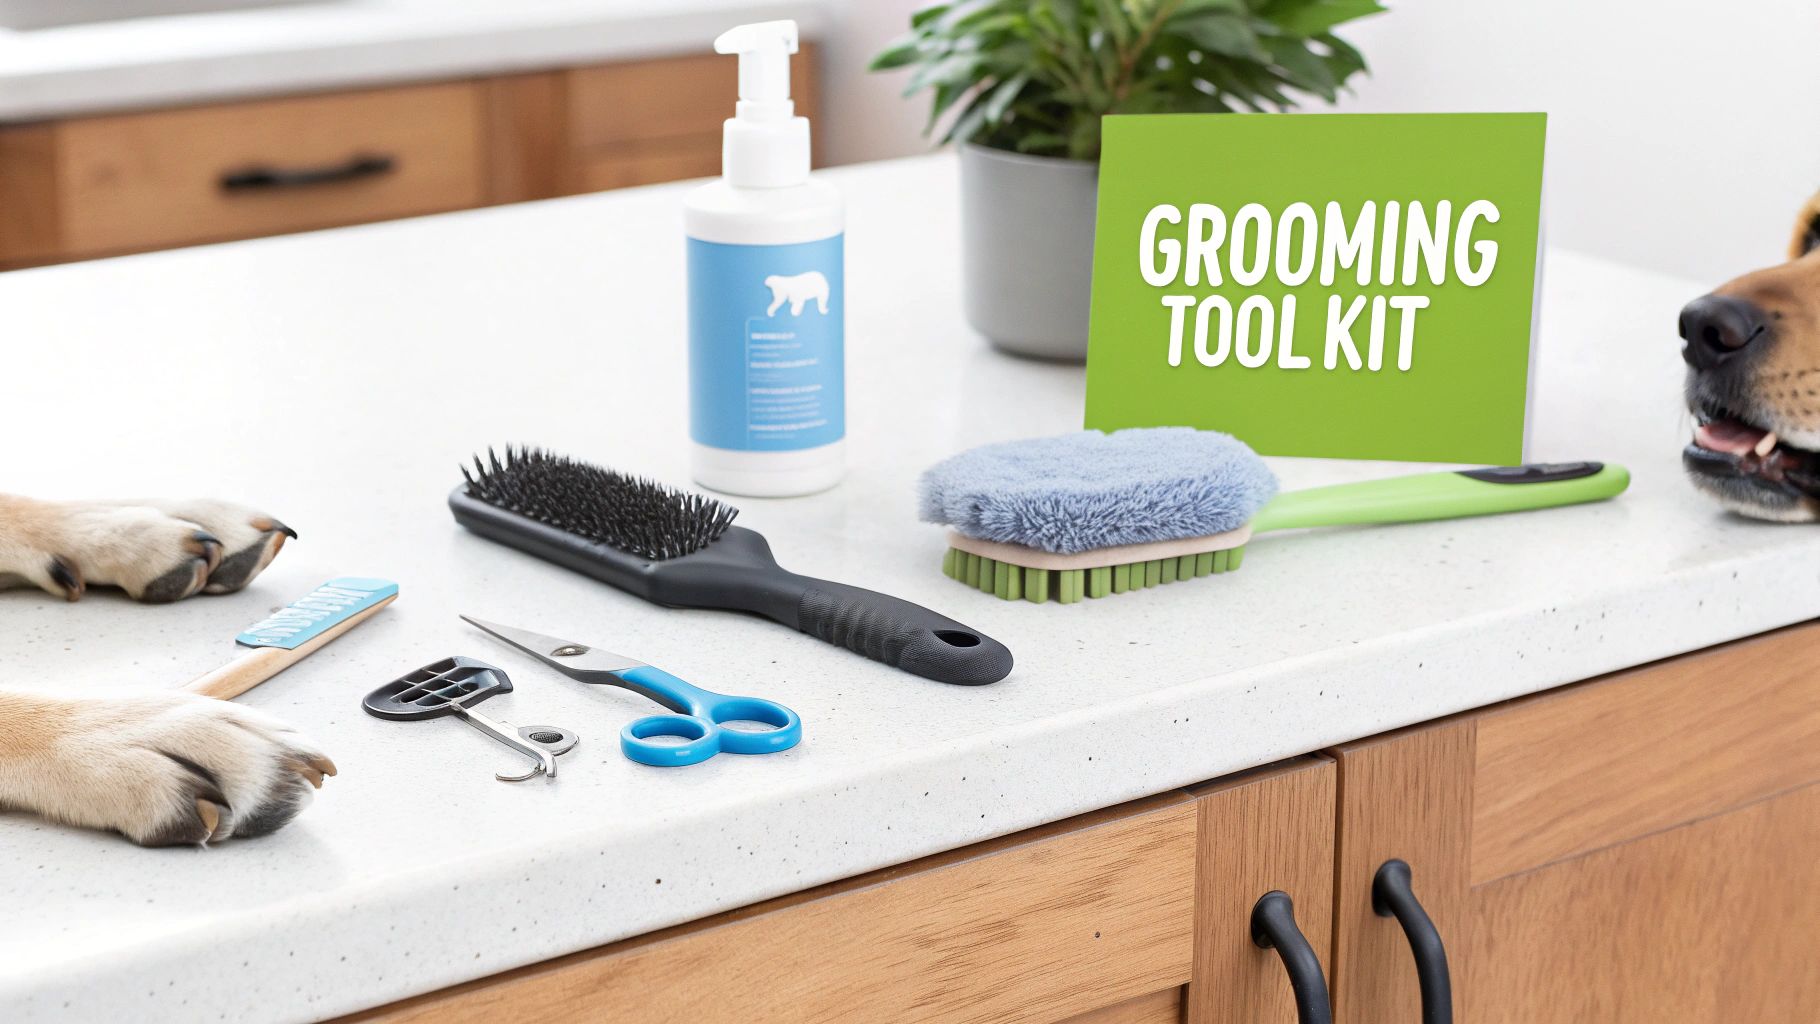
Without the proper equipment, you're setting yourself up for a struggle that can cause your dog discomfort and make the process a headache for both of you. Think of your toolkit as the foundation for success—the right gear makes every step smoother.
The investment in quality home grooming tools pays off. The global pet grooming services market reached USD 6.89 billion in 2024 and is projected to hit USD 10.35 billion by 2030. With dog owners making up about 83% of that spending, it's clear that high-quality care is a priority, even when grooming at home.
Action Step 1: Match Brushes and Combs to Your Dog's Coat
Using the wrong brush is useless at best and painful at worst. Your immediate goal is to match the tool to your dog’s specific coat type. This allows you to effectively remove mats, manage shedding, and distribute healthy natural oils.
For a Golden Retriever with a thick double coat, your primary tool is a slicker brush to penetrate the dense undercoat and remove loose fur. Follow up with an undercoat rake during shedding season to prevent fur from taking over your house. In contrast, a Boxer only needs a bristle brush or rubber curry comb to remove fine hairs and stimulate the skin.
Here is a quick action guide to the most common brush types:
- Slicker Brush: Features fine, short wires. This is your workhorse tool for medium-to-long-haired or curly-coated dogs like Poodles to break up tangles.
- Pin Brush: Resembles a human hairbrush. Use this for finishing and fluffing long, silky coats on dogs like a Yorkshire Terrier.
- Bristle Brush: The ideal choice for short-haired, smooth-coated breeds like Beagles. Use it to remove loose hair and boost shine.
- Undercoat Rake/De-shedding Tool: This is non-negotiable for double-coated breeds like Huskies or German Shepherds. It removes dead undercoat fur without damaging the topcoat.
Use this table to select the right tools for your dog's coat.
Essential Grooming Tools by Dog Coat Type
| Coat Type | Essential Brushes/Combs | Key Additional Tools |
|---|---|---|
| Short/Smooth (Boxer, Beagle) | Bristle Brush, Rubber Curry Comb | Nail Clippers, Gentle Shampoo |
| Double Coat (Husky, Golden Retriever) | Slicker Brush, Undercoat Rake | De-shedding Shampoo, High-Velocity Dryer |
| Long/Silky (Yorkie, Maltese) | Pin Brush, Steel "Greyhound" Comb | Detangling Spray, Small Trimming Scissors |
| Curly/Wavy (Poodle, Doodle) | Slicker Brush, Poodle Comb | Clippers with Guard Combs, Conditioning Spray |
| Wiry (Schnauzer, Terrier) | Stripping Knife, Slicker Brush | Thinning Shears, Ear Powder |
Having these basics ready ensures you can handle your dog's specific grooming needs.
Action Step 2: Select Safe Clippers and Shampoos
Beyond brushing, a few other items are critical. Safe, sharp nail clippers are a must, as overgrown nails are painful and can damage your dog’s posture. Your two main options are guillotine-style clippers or nail grinders. Clippers are fast, while a grinder provides more control to smooth the nail—an excellent choice if you're nervous about hitting the quick.
A dog-specific shampoo is also non-negotiable. Do not use human shampoo; its pH balance will strip your dog’s skin of its natural oils, causing dryness and irritation. Select a formula made for dogs, such as an oatmeal shampoo for sensitive skin or a tearless one for a puppy.
For a complete look at what you'll need, check out this detailed guide on the best grooming tools for dogs.
Creating a Calm and Safe Grooming Space
Successful home grooming is built on a foundation of safety and trust. Your goal is to transform a potentially scary task into a predictable, positive bonding moment. Your dog mirrors your energy—if you are calm and prepared, they are more likely to be as well.
The right location makes all the difference. Choose a quiet, well-lit area free from interruptions. For many, the bathroom is ideal: surfaces are easy to clean, and the contained space can help a dog feel more secure.
Regardless of the location, ensure the surface is stable. A slippery floor immediately creates anxiety. Always place a non-slip bath mat or a thick towel to give your dog solid footing, whether they are in a tub or on the floor.
Action Step 3: Introduce Tools to Create Positive Associations
New sights and sounds can intimidate a dog. Your task is to desensitize your pet to the grooming tools before you ever use them. This process requires patience but yields significant long-term benefits.
Start by placing the tools on the floor. Let your dog sniff the clippers (while off), the brush, and the nail grinder. When they show calm curiosity, immediately reward them with a high-value treat and praise. Repeat this for a few minutes each day for several days.
Next, introduce sound. Turn on the clippers or grinder for one second, then instantly give your dog a treat. You are creating an association: the strange noise makes a delicious treat appear. Gradually increase the time the tool is on, always following with a reward, until the sound becomes background noise.
Actionable Insight: Never force an interaction. At the first sign of stress—such as yawning, lip licking, or turning away—stop the session. End on a positive note with one last treat and try again later. Short, successful sessions are far more effective than pushing your dog beyond their comfort zone.
Action Step 4: Establish a Pre-Grooming Ritual
Dogs thrive on routine. A consistent pre-grooming ritual signals that a calm, predictable activity is about to occur, reducing anxiety.
Your ritual should be simple and consistent. Follow this effective sequence:
- A Calming Walk: Start with a walk or playtime to burn off excess energy. A tired dog is a more cooperative dog.
- A Gentle Check-In: Before grabbing any tools, sit with your dog and run your hands over their entire body. Use this time to feel for new lumps, bumps, tangles, or skin issues. This doubles as a health check and accustoms them to being handled.
- Offer a Distraction: A lick mat with xylitol-free peanut butter or plain yogurt can keep a dog happily occupied. Stick it to the tub wall or floor to give them a positive focus point during the groom.
This "walk, check, treat" sequence builds a powerful, positive foundation. It reframes the experience from something that happens to them into a structured activity they can predict and manage.
Mastering Brushing and De-matting Techniques
Effective brushing is the cornerstone of a healthy coat. To groom your dog at home properly, you must learn techniques that reach the skin, preventing painful mats and promoting skin health. This is more than just a surface-level tidy-up.
The U.S. pet grooming market reached USD 2.06 billion in 2023, highlighting a collective commitment to pet wellness. A solid home grooming routine, anchored by proper brushing, is a direct investment in your dog's comfort and health.
This graphic outlines the essential prep work before you start brushing.
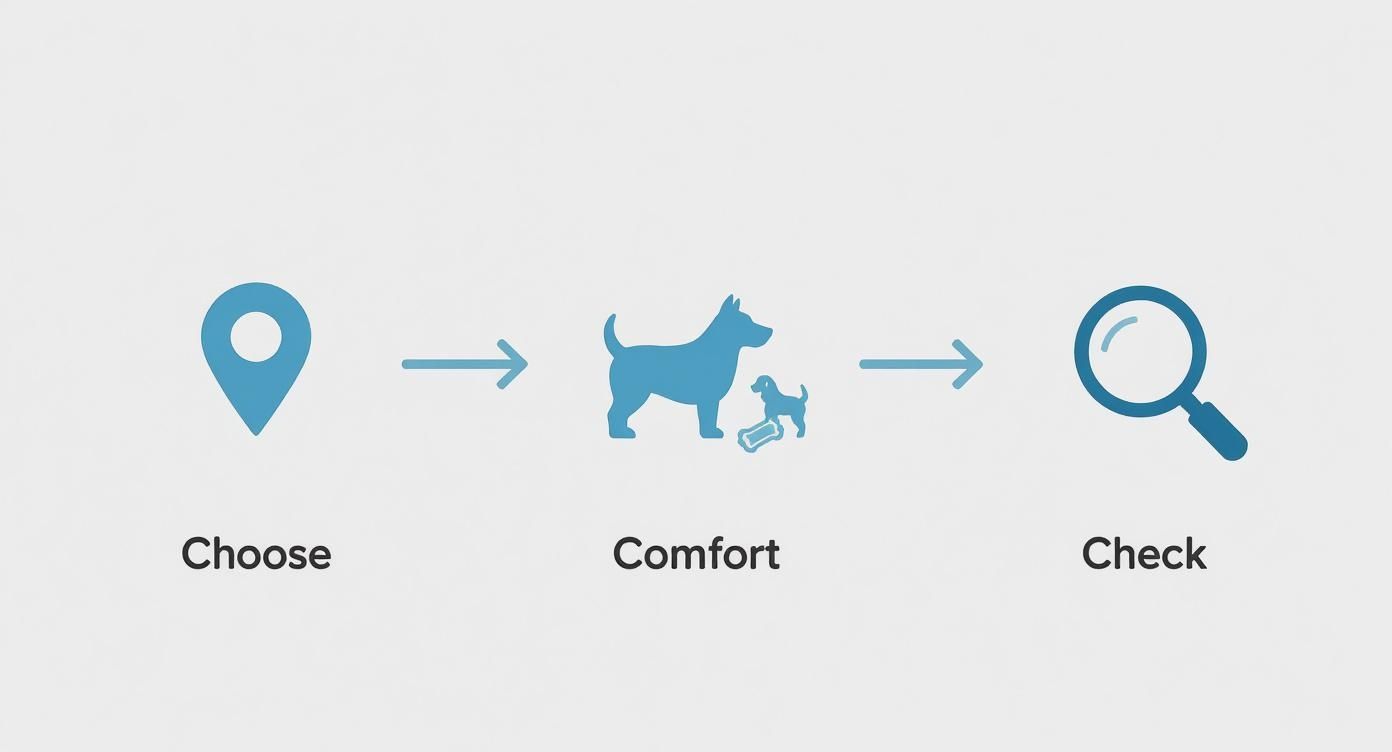
As shown, everything begins with a calm space and a quick health check. Nailing this preparation will make the entire grooming process smoother.
Brushing Techniques for Different Coat Types
The correct technique depends entirely on your dog's coat. A method that works for a Labrador will create tangles on a Poodle. Here are two essential techniques you need to master.
Line Brushing for Double Coats
For dogs like Huskies, Golden Retrievers, or German Shepherds, line brushing is essential. This method is the only way to effectively penetrate the dense undercoat and remove trapped dead fur.
- Start on one area, such as a back leg.
- Use one hand to lift a section of the topcoat, creating a horizontal "part."
- With your other hand, use a slicker brush or undercoat rake to brush the fur below the part line, moving away from the skin.
- Once that section is tangle-free, move the part up an inch and repeat the process.
This methodical approach prevents the undercoat from becoming impacted, which can lead to skin irritation and hotspots.
Pat-and-Pull for Curly Coats
For Poodles, Doodles, and other curly-coated breeds prone to matting at the root, the pat-and-pull method is ideal. It uses a slicker brush to detangle down to the skin without destroying the curl pattern.
Instead of dragging the brush, gently pat it into a small section of fur. Then, pull it away from the skin in a straight motion. This breaks up knots without painful yanking. Work in small, organized sections across the entire body.
Actionable Tip: To check your work, use a metal "greyhound" comb. After brushing a section, glide the comb through the fur from root to tip. If it moves smoothly, you're done. If it snags, return to that spot with the slicker brush.
Safely Handling Mats and Tangles
Even with regular brushing, mats can form in high-friction areas like behind the ears, in the armpits, and under the collar. A small tangle can become a tight, painful mat quickly.
If you find a small mat, follow these steps:
- Do not get it wet. Water will tighten the mat, making it nearly impossible to remove.
- Apply a detangling spray. A light mist adds slip to the fur, easing the process.
- Use your fingers first. Gently try to pull the mat apart into smaller sections.
- Use the end tooth of a comb. Carefully pick at the mat's outer edges, working inward. Hold the hair at the base against the skin to prevent pulling.
Knowing When to Call a Professional
Be realistic about your limits. Some mats are too severe to handle at home. If a mat is tight against the skin, covers a large area, or causes your dog pain, do not use scissors. A dog's skin is thin and elastic, making it incredibly easy to cut them accidentally.
In these cases, the safest and most humane action is to call a professional groomer. They have the tools and expertise to shave the mat out safely. To prevent future mats, ensure you have the right tools. Explore a selection of dog grooming brushes and combs to find the perfect match for your dog's coat.
Bathing and Drying Without the Drama
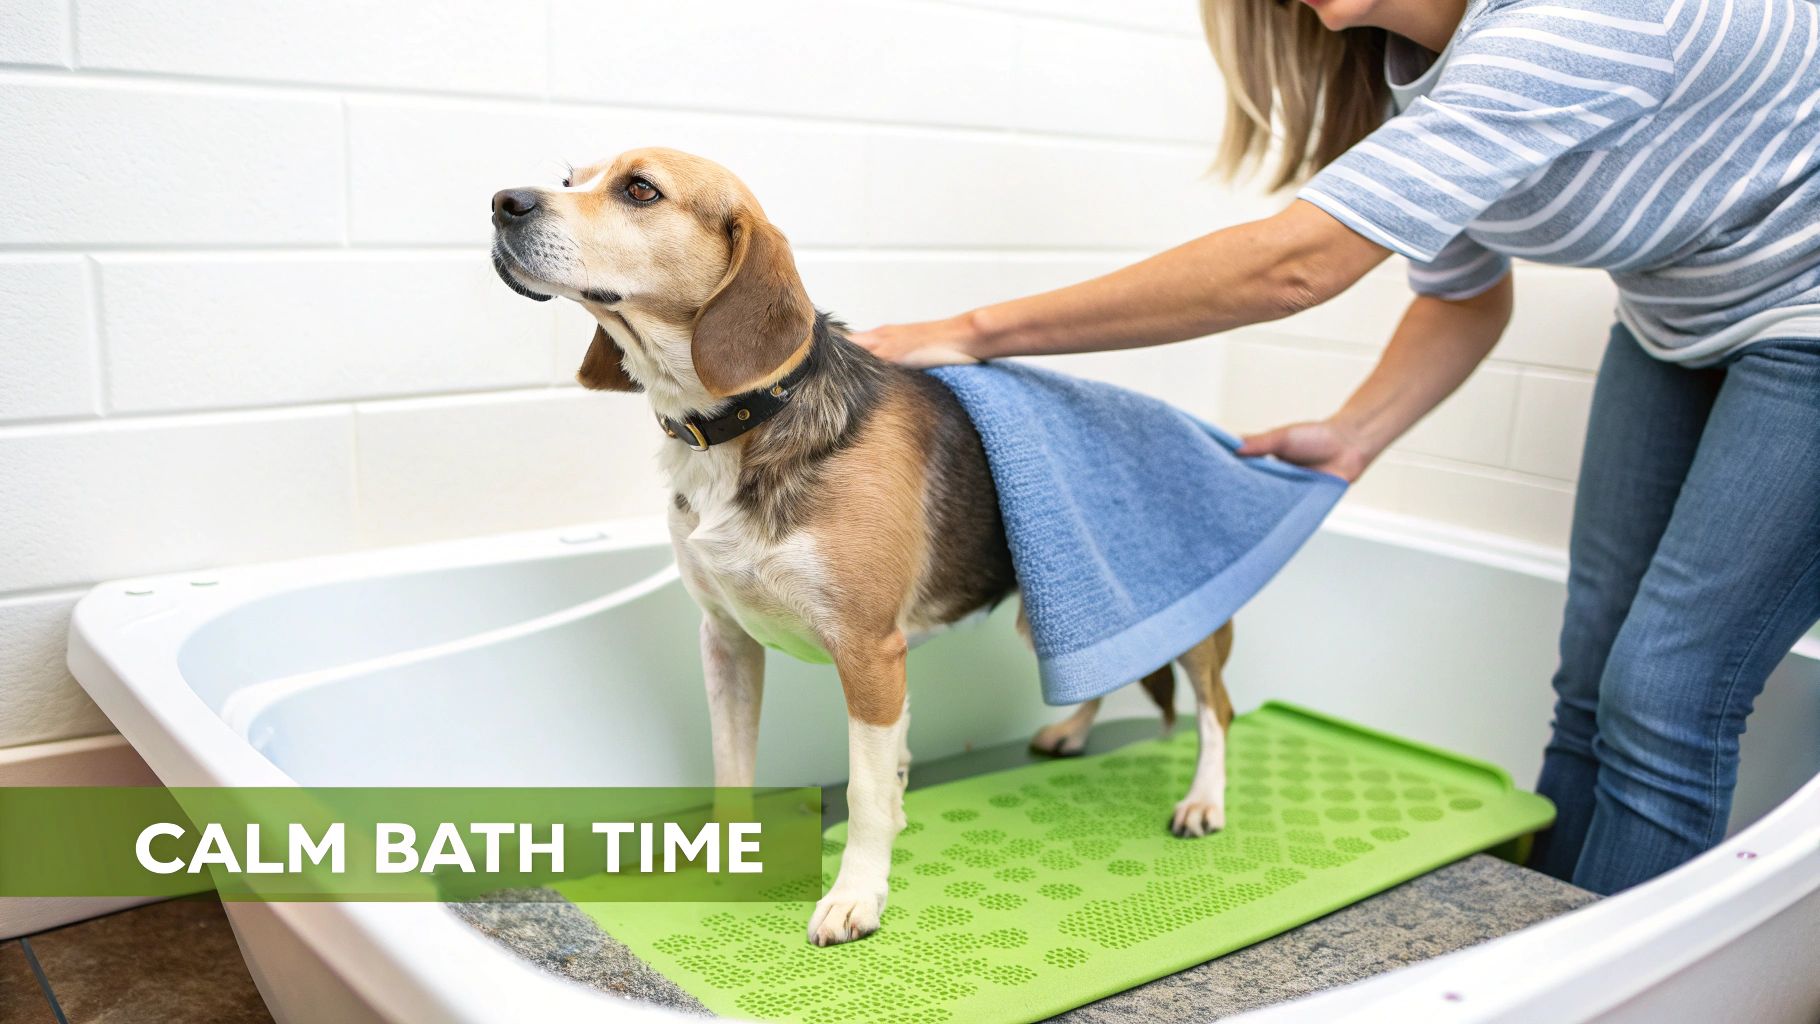
Bath time doesn't have to end with a soaked bathroom and a stressed-out owner. A successful wash is the result of methodical preparation and a calm approach.
Before turning on the water, set up your station. First, lay down a non-slip mat in the tub. This gives your dog secure footing and prevents panic. Next, gently place cotton balls just inside your dog's ears (do not push them in) to help keep water out and prevent ear infections.
Arrange all your supplies within arm's reach: shampoo, conditioner, a cup for rinsing, and at least two towels. You don't want to be searching for supplies while holding a wet, shivering dog.
Action Step 5: Choose and Apply Shampoo Correctly
The shampoo you choose directly impacts your dog's skin health. Always use a shampoo formulated specifically for dogs. Human products have an incorrect pH balance that strips their skin of natural oils.
Select a shampoo based on your dog's needs:
- For dry, itchy skin, use a soothing oatmeal-based shampoo.
- For bacterial or fungal issues, use a medicated wash recommended by your vet.
- For puppies, a gentle, tearless formula is essential.
Actionable Tip: Dilute the shampoo with water in a separate bottle before applying. This helps it spread more evenly and makes it much easier to rinse out completely. Leftover soap residue is a primary cause of post-bath itching.
The Lather and Rinse Process
Once your dog is secure, use lukewarm water to wet their coat thoroughly from the neck down. Avoid spraying their face directly; use a damp washcloth to gently wipe their face later.
Apply the diluted shampoo and work it into a gentle lather, massaging it down to the skin. This massage can help relax a tense dog.
Rinsing is the most critical step. When you think you have rinsed enough, rinse one more time. Squeeze excess water from the coat, paying close attention to areas where soap can hide, like under their legs and on their belly.
Mastering the Art of Drying
Proper drying is crucial for preventing skin issues like hotspots, especially in dogs with thick or double coats. A damp undercoat is a breeding ground for bacteria.
- Towel Drying: Begin with a highly absorbent towel, like a microfiber one. Blot and squeeze the fur; do not rub vigorously, as this creates tangles.
- Pet-Safe Hairdryer: For a thorough dry, a hairdryer is an invaluable tool. Never use your personal hairdryer on a hot setting, as it can easily burn your dog's skin. Use a pet-specific dryer or your own on the coolest, lowest setting.
- Acclimatize Your Dog: Introduce the dryer slowly to reduce fear. Let them sniff it while it is off. Then, turn it on from a distance for a few seconds and offer a high-value treat. Keep the airflow constantly moving and never concentrate it on one spot.
A proper dry leaves your dog's coat and skin healthy, concluding the grooming session on a positive note.
Handling Nail Trims and Ear Care with Confidence
Nail trimming and ear cleaning can be intimidating, but with the right technique and a calm approach, they can become a stress-free part of your routine. Confidence comes from knowing exactly what to do.
Many dogs dislike having their paws handled, making nail trims a challenge. Your objective is not to make them enjoy it, but to make it a neutral experience. Remember, overgrown nails cause pain, affect posture, and can lead to joint issues.
Action Step 6: Navigate Nail Trims Safely
The primary fear is cutting the quick—the bundle of nerves and blood vessels inside the nail. On light-colored nails, the pink quick is often visible. On dark nails, it is invisible from the side.
Adopt a "less is more" strategy. Instead of cutting a large piece of nail, make tiny, gradual clips from the tip. After each snip, examine the cut surface. As you near the quick, a dark, fleshy-looking circle will appear in the center. That is your signal to stop.
Actionable Takeaway: Always make small, deliberate cuts. It is better to trim a small amount frequently than to risk hitting the quick. A moment of patience prevents pain and bleeding.
You have two main tool options: clippers or a grinder.
- Clippers (Guillotine or Scissor-Style): These are quick, quiet, and effective for dogs who are not sensitive to the clipping sensation.
- Grinders: These tools file the nail down, offering more control to smooth the nail and get close to the quick without a sharp cut. The noise and vibration require desensitization for anxious dogs.
The best tool depends on your dog's temperament and your comfort level. To learn more, explore these different types of dog nail cutters and their benefits.
Action Step 7: Perform Routine Ear Checks and Cleaning
A dog's ears, particularly floppy ones that trap moisture, can harbor yeast and bacteria. Regular checks prevent painful infections. Once a week, lift your dog's ear flap and inspect the inside.
Healthy ears should be pale pink and clean, with no strong odor. If you see redness, dark waxy buildup (resembling coffee grounds), or notice a foul smell, call your vet. These are signs of an infection requiring medical treatment.
For a routine cleaning, follow these steps:
- Gather your supplies: a vet-approved ear cleaning solution and clean cotton balls or gauze.
- Gently hold your dog's ear flap up to expose the ear canal.
- Squeeze enough cleaning solution into the ear to fill the canal.
- Massage the base of the ear for 20-30 seconds. A squishing sound indicates the solution is breaking up debris.
- Stand back and let your dog shake their head. This brings loosened debris up from the canal.
- Use a cotton ball or gauze to gently wipe away visible grime from the outer part of the ear.
Crucially, never use cotton swabs (like Q-tips) inside the ear canal. You can easily push debris deeper or damage the eardrum. Only clean the parts you can see.
Beyond these tasks, remember that oral hygiene is vital for overall health. You can master dental care for dogs with brushing techniques to complete your comprehensive home care routine. Handling these tasks confidently is a direct contribution to your dog's long-term wellness.
Building a Realistic Home Grooming Schedule
Consistency transforms dog grooming from a major project into a manageable routine. The key is to create a practical schedule that fits your dog's specific needs and your lifestyle.
A Golden Retriever requires brushing once or twice a week to manage shedding, while a Pug needs its facial wrinkles wiped daily to prevent skin infections. Your schedule must reflect these unique requirements.
A useful tactic is to "piggyback" grooming tasks onto existing habits. For example, make Sunday afternoon your dedicated brush-out time, or clean your dog’s ears on the first of every month. This helps grooming become a predictable habit.
Timing and Frequency Are Everything
When you groom can significantly impact your dog's cooperation. The ideal time is often after a long walk or vigorous play session. A tired dog is a more relaxed and compliant dog.
For puppies or anxious dogs, short, frequent sessions are more effective. Five minutes of positive brushing daily builds more trust than a stressful 30-minute battle once a week. The goal is to create a positive association with being handled.
Actionable Insight: Don't aim for perfection in every session. If your dog is having an off day, it's okay to trim the nails on just one paw or only brush their right side. Ending on a positive note is always more important than completing the entire job.
Sample Grooming Frequency by Dog Breed/Coat Type
Use this table as a starting point for your routine. Always adjust based on your dog's coat condition, activity level, and specific health needs.
| Breed Example | Brushing Frequency | Bathing Frequency | Nail Trim Frequency |
|---|---|---|---|
| Golden Retriever | 2-3 times per week | Every 6-8 weeks | Every 3-4 weeks |
| Poodle/Doodle | Daily or every other day | Every 4-6 weeks | Every 4-6 weeks |
| Pug | Once per week (daily face folds) | Every 4-6 weeks | Every 2-3 weeks |
| German Shepherd | 2-3 times per week | Seasonally (or every 2-3 months) | Every 4-6 weeks |
This chart is a guide. Observe how your dog's coat and skin respond and fine-tune the schedule until it's perfect for them.
Troubleshooting Common Hurdles
Even with a great schedule, you will encounter challenges. If your dog hates having their paws touched—a common issue—the solution is slow, gradual desensitization.
Start by touching your dog's leg for one second, then immediately provide a high-value treat. Over several days, slowly work your way down to their paw, and then to individual toes, rewarding calm behavior at each step.
Eventually, they will learn that a touch on the paw predicts a reward. This step-by-step process helps you overcome grooming roadblocks and build a successful and positive routine.
Common Questions About Home Dog Grooming
It's normal to have questions when you start grooming your dog at home. Having clear answers provides the confidence to build an effective routine.
A frequent question is about bathing frequency. A general rule for most dogs is a bath every 4 to 6 weeks. Bathing too often can strip the natural oils from their skin and coat, leading to dryness and irritation. Of course, a muddy adventure may require an unscheduled bath!
Hair Trimming and When to Call a Pro
Another common concern is trimming hair at home. While you can handle minor touch-ups, proceed with caution.
It is acceptable to trim the hair around your dog’s eyes or between their paw pads. Always use blunt-nosed safety scissors to prevent injury. For larger jobs like a full-body clip or a breed-specific haircut, it is best to consult a professional groomer until you have received hands-on training. A groomer is also your best resource for severe matting.
Consider your professional groomer a partner in your dog’s health. Don't hesitate to book an appointment for difficult tasks or for a periodic "reset" to simplify your at-home maintenance.
What If My Dog Hates Grooming?
If your dog is anxious about grooming, you can change their response with patience and positive reinforcement.
- Keep Sessions Short: Start with five-minute sessions of calm brushing. Always end with a high-value treat.
- Desensitize to Tools: Allow your dog to sniff tools like clippers while they are off. Reward their calm curiosity with praise and a treat.
- Use Timing to Your Advantage: Groom after a long walk when your dog is tired and more relaxed.
For comprehensive pet care, resources for ordering pet medications online can supplement your hands-on grooming efforts to keep your dog healthy.
Ready to build the perfect at-home grooming kit? Pet Magasin offers durable, high-quality grooming tools designed for safety and ease of use. Explore our collection and turn grooming into a positive bonding experience at https://www.petmagasin.com.

Leave a comment